
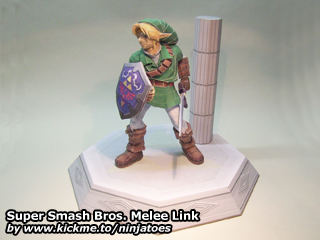
031006 Super Smash Bros. Melee Link (June 12, 2007)
from: Super Smash Bros. Melee video game / size: ± 19,5 cm
Download:
parts with fold lines (3,16 MB PDF file)
parts without fold lines (3,06 MB PDF file)
display stand (4,54 MB ZIP file)
instructions (3,34 MB ZIP file)
some extra help on Melee Link’s boot: 1
Pictures:
Google Photos

Hey there … it has been a while since I’ve done any papercraft models and I thought this was the perfect one to get back into it, I have previously dont your going merry (which looks awesome) and Auron … I am having a little trouble with this model … I have the legs and skirt built and I am onto the Toso, The only problem is the start of the arms … parts 58-59 ie. the shoulders arent as big as they seem in your pictures (looks as if a piece is missing?) and the parts that go inside the shoulders (62 and 63) dont seem to fit … I have been doing this model for about 6 hours and I love how it is looking :) Any help would be great
I’m happy to hear you’re enjoying your papercraft “Melee Link” so far, it’s possibly the most challenging and difficult paper models I made so far with so many tiny parts…!
Part 58 glues into a ring, but part 59 doesn’t go all the way around! The side that you can’t see in the pictures in the instructions is open, and goes over the “shoulder hole” of the torso.
Part 62 doesn’t glue to the open bottom of the arm, but further up inside the arm where it’s narrower (kind of along the edge between parts 58 and 59; the same for the other arm of course).
They’re tricky parts to get in exactly the right place, so take your time and don’t worry if it’s not 100% perfect; these pieces just serve as a place to glue on the arms later on, so the most important thing is to make sure that the angle is so that the arms won’t be in an awkward position, and any imperfections in glueing parts 62 and 63 inside the shoulders won’t really be visible aftwards. ;o)
It’s very difficult to try and explain how to assemble a papercraft model in words, so I hope you understand my description and get it to work on your papercraft Melee Link; have fun building!
i guess it doesnt help that this is my first papercraft model lol, however i did manage to build the Stand, im sure i’ll figure this out, i just need to try a different approach.
i have all the files, i printed everything correctly, but im struggling on the first boot, the step by step is just really bad, the pictures are so small you cant see anything, and they are of what its supposed to look like when done, not really a step by step image, this is insanely difficult but i dont think it needed to be This difficult. i was fortunate enough to get this far because of a youtube vid that had a speed up build of this model, but even it only shows so much. i wont give up, it looks amazing. but i feel like im really on my own here lol
I’m afraid that on my old models, the instructional pictures made with my old camera aren’t the best, no… :o( Sometimes it helps if you can zoom in and/or change the brightness, but Melee Link will still be a very challenging model where you need to examine all the parts and fold lines very closely and keep trying to find the right way to shape and glue them together.
Haywan Chiu from the Papercraft Museum website double-sized my papercraft Melee Link when he built it: http://www.papercraftmuseum.com/link-adult-double-sized/
The parts are still the same of course, so maybe it will help only a little bit if the parts are a little bit bigger? I also know this website has a few extra pictures of when they built the model: http://www.skizo.org/forum/index.php?showtopic=17323 but it’s probably still not a lot of help, sorry…
I hope you will be able to finish it by trying and trying, but of course if it really starts to get frustrating, take a break for a while, and put the parts and printed sheets in a safe place so you can continue later on if you want to (if you just try to keep going when it’s getting really frustrating, it will only become a lot more frustrating very quickly… :o(
sorry man, i give up. 2 days and cant get passed the first boot. every attempt at this comes out completely different, i Highly recommend upgrading, making a walkthrough. Or something like a video or even some high quality pictures of all angles and an actual Step by Step.manual. .its a lovely craft, but as it stands, id be surprised if anyone was able to build it =(
Papercraft is supposed to be fun of course, and when you find it so difficult that it becomes really frustrating, you really don’t need to feel bad (especially not about a very challenging model like Melee Link!) that you dont want to go on with it of course! ;o)
In the “hall of fame” you can find some examples of people that did build it, but they’re usually only “finished” pictures, so I don’t think it would be much help to show you how to build it unfortunately: https://ninjatoes.wordpress.com/?s=melee+link
(and on many other websites of course, like the two I mentioned before, because when people do manage to build it, they’re usually (and rightfully! ;o) very proud of it and want to show it off!)
Even for very experienced papercrafters Melee Link is still *very* challenging, but I hope you don’t give up on papercraft completely, because you can find *lots* more paper models online nowadays, including many from the Zelda series if you’re a fan of the series! (but from lots of other games, movies and lots more too of course! ;o)
the model is beautiful, but the tutorial is a Joke. the pictures couldn’t be any smaller, and there is no step by step instructions, just a pic of what its supposed to look like. kinda like a teacher showing you how to do a 2+2 problem, then giving you a calculus question and saying solve it.
The step-by-step instructions are in the ZIP-file you can download, so unlike the PDF instructions on most of my paper models, you have to unzip it first to see the instruction pictures…!
It’s best not to print them (there are too many anyway! ;o) but to view them on the computer if you need them, so you can zoom in and/or change the brightness to make it a little easier to see.
Make sure to check with the papercraft Melee Link version *with* lines that you didn’t miss any fold lines, and that you folded them the right way (up or down; again, look at it on the computer if you’re not sure, because on the printed version, it can be very hard to see the fold lines!)
That way, you can “pre-shape” the parts to make it easier to glue them together; try fitting them together without glue first, to see if it looks like the pictures in the instructions. If everything is okay, you can apply some glue and glue them together, or if it’s not right, you can check to see if you shaped the part correctly or try a different way if it turns out you missed a fold line or maybe folded it the wrong way and still change it.
The way the parts are arranged on the template is also an indication of how the parts should fit together: parts that are supposed to be glued together are usually right next to each other, and because there are so many parts, I also added a lot of black arrow guides to show you which part goes where (the small, grey arrows are only to show the directions of the fold lines!)
I’m sorry I can’t really make it easier for you, Melee Link really probably is the most challenging paper model I made so far; just like with any papercraft model, you really need to take your time and have a lot of patience to study the parts and instructions and figure out how to shape and glue them all together, especially because Melee Link has so many and such small parts…!
.PDO Pleeeeeeeeese!
Because I always do the last fixes and finishing touches to the final templates in Photoshop after the test builds, the templates can’t go back into Pepakura Designer after that of course, so my paper models are never released in PDO format, sorry!
Melee Link is a very challenging paper model to build with lots of very small parts and folds.
Even if you’re building the version with lines, the fold lines can sometimes be difficult to see on the printed version, so if you’re not sure if you may have missed any fold lines so the parts won’t fold the right way, check with the PDF file with lines (then you can zoom in and/or change the brightness of your screen to make sure you can see all the fold lines).
On the templates there are also *lots* of directions, so take your time to understand what they all mean: it’s best if you can already imagine how you need to fold and glue the part in your head before you actually do it. ;o)
And even then, if you’re not sure, try it without glue first: it’s a lot of work figuring out the parts that don’t seem to fit at first, but often you can only try it a few different ways, and one of them has to be the right one of course.
Check with the pictures in the instructions to see if it looks the same, and of course if it fits the way you thought. If not, you can still change it, and if it does, you can apply some glue and glue it on of course.
I’m sorry I can’t help you better than this, but I hope if you take your time working out how to shape and fold all the parts (maybe taking a break if all the small parts are becoming frustratingly difficult!) you’ll be able to build it! ;o)