
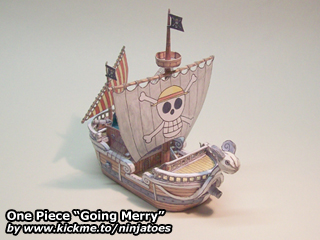
007002 One Piece “Going Merry” (August 6, 2004)
from: One Piece anime series / size: ± 14 cm x 5,5 cm x 13,5 cm
Download:
parts (878 kB ZIP file)
instructions (1,04 MB ZIP file)
Repaint by chiohunpp (?):
parts + instructions (3,00 MB ZIP file)
Mini Merry bonus (1,82 MB ZIP file)
Pictures:
Google Photos

Hello
Thank You!
its awesome
Thank you for the compliment, I enjoyed making it! ;o)
’twas cool. Its kinda hard to look in the internet for this one piece paper craft. There are some links given in the youtube but those are Chinese and Japanese version that I couldn’t understand. Thanks to you…
Do you have a papercraft version of thousand sunny as well…?
Many thanks to you…
Hi there! I’m happy to hear you found my papercraft then! ;o) I haven’t made a Thousand Sunny version yet, but somebody did use my Going Merry to make a Mini Merry, you can see it here: http://ninjatoes.blogspot.com/2012/01/papercraft-going-merry-repaint-mini.html
Paper-Replika did make a Thousand Sunny before, it’s a lot bigger though and you can see it here: http://ninjatoes.blogspot.com/2013/01/papercraft-one-piece-thousand-sunny_11.html
There’s also an offical version from Toei Animation here: http://www.toei-anim.co.jp/tv/onep_/special/sny.php it’s an old website and the images don’t all work anymore, but if you move your mouse pointer around near the bottom you will hover over the download links for the manual.pdf and the sunny1, 2, 3, 4 and 5.pdf parts.
thank’s….i want to ask what you use to make this??
im sorry my english is not good :D
I made this paper model just by drawing the parts on a piece of paper with a pencil, and then colouring in the parts with water colours (aquarel), and then I scanned the parts so I had a digital version to upload on my website for other people too.
So if you want to build it yourself, you can download those parts that I scanned right here, by clicking the links in the “Going Merry” posts (you can choose my original, water-coloured version, or the digital “repaint” that chiohunpp made.
To keep the part sheets together and to save webspace, I put them in a ZIP-file, so you need to “unzip” them first. Most computers already have an unzipping software, so after downloading the ZIP-file, you just have to double-click it and your “unzipping” software will unpack the file (if you don’t have an unzipping software yet, you can find many free ones online, like http://www.7-zip.org/ or one of the many other free ones).
After unpacking the part files, you will see that they in the case of the “Going Merry”, they are simple JPG files, that you can open and print with any image viewer (make sure to keep the printing scale the same, but because the pages are the same size, normally your image software will do that automatically if you keep the same settings and don’t change anything).
To make it easier to build and to make the final paper model stronger, it’s best to use thicker paper than regular printer paper (in some countries thicker paper it’s called “cardstock”). I always use 200 gsm (“grams per square meter”) paper that’s about 2.5 times as thick as regular printer paper (that’s usually just 75-80 gsm), but some people find that *too* thick, so they use 120 or 160 gsm (1.5-2x as thick as regular printer paper) so you can see how thick a paper exactly you should use is really just a personal choice, and I would look around in shops near where you live what thickness of paper you can easily get and then make your own choice.
After that, you can cut out the parts with a sharp hobby/craft knife, shape and fold the parts and then glue them together. I included instructions (with pictures and English text; if you’re having trouble understanding it, try selecting and copying the text in a translation service like https://translate.google.com/ : the translation won’t be perfect, but usually it’s enough to get a general idea of what is meant ;o)
The “Going Merry” has quite a lot of small parts, so it’s not always very easy to make, so it’s important to take your time. If you’re not sure, it’s always a good idea to try fitting on the part you’re having trouble with without glue first, then if it fits and it looks like the instructions, you can apply the glue, otherwise you can still try a different way.
On the Yamaha website you can watch several videos that have some good basic papercrafting tips: http://global.yamaha-motor.com/yamahastyle/entertainment/papercraft/howto/0002.html
Have fun! ;o)
cool !!
Thank you for the compliment! The “Going Merry” was one of the first “serious” papercraft models I made, all by hand, and I still like it too! ;o)
thanks you so much!
Thank *you*! I enjoy making paper models, so I’m happy to hear you like them too! ;o)