
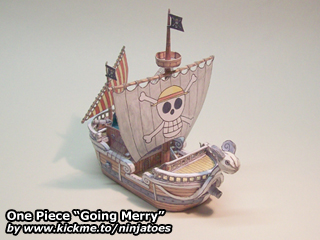
007002 One Piece “Going Merry” (August 6, 2004)
from: One Piece anime series / size: ± 14 cm x 5,5 cm x 13,5 cm
Download:
parts (878 kB ZIP file)
instructions (1,04 MB ZIP file)
Repaint by chiohunpp (?):
parts + instructions (3,00 MB ZIP file)
Mini Merry bonus (1,82 MB ZIP file)
Pictures:
Google Photos

I tried to download this model but I am unable to do it. Please help.
Both the links for the parts and the instructions seem to be working fine. If left-clicking doesn’t work, try right-clicking on the links and then choose “Save as…” to download the files to your computer.
Try emptying your temporary internet files and cache first and closing and re-opening the browser window to prevent your browser from trying to open a possibly temporary, corrupted download of the file.
Both files are ZIP-files, so before you can open the actual paper model files, you will have to unzip them using a file archiver like 7-Zip or WinZip/WinRar.
I hope this helps, have fun building!
I thought it was called the merry go
Although Viz Media calls it the “Merry Go” most fansubs called it the “Going Merry” long before that, and to be honest, I just think it sounds better… ;o)
The original japanese name translates as something like “Going Merry-go” but I’m glad they didn’t use *that*… ;o)
i love this papercraft but the hole punching gets boring
Yeah, tell me about it! Papercraft usually has a lot of repetitive work; cutting out the parts and the glueing tabs always takes a lot more time than actually glueing the model together…
I found a sheet of paper protector in an old binder, so I cut half of it out to the size of a regular sheet. The printer caught hold and printed on it, but just minutes later I noticed that the ink was starting to pool into little dots rather then stay firmly on the sheet as it ought to. Hours latter it still smudges when touched, so I think it’s safe to say it’s not going to dry like it should. So thanks for the suggestion to use tape, I’m going to go with that.
I’ll e-mail you pictures when I’m all done. It’s gonna look great!
Yes, normal transparancies are too “smooth” to hold the ink from an inkjet printer. It’s exactly like you say: when it comes out it looks okay, but if you touch it you will smear the ink right off and after only a few seconds the ink starts to “move” together into small drops…
Printable transparancies are a bit rough when you feel the surface, so I think that’s why they can hold the ink. but like I said, they’re very expensive… :o(
Have you tried using a black permanent marker/pen to trace the design? Because it’s basically just a bunch of black lines. That might even be easier than printing the design and then trying to put clear tape over it, because you are likely to smear the ink when you try to put on the tape because the ink is just sitting on the surface…
If you use a black permanent marker/pen there is less danger to smear the lines when you put on the tape. But you should try it to see how it looks and if you like it, because it’s your boat after all! ;o)
I remembered someone in the hall of fame who did the same thing: https://ninjatoes.wordpress.com/2005/06/30/one-piece-going-merry-by-jeffery-nguyen/
Have fun!
Well all is said and done now. It’s 3:20 AM and it is complete. For one I don’t have any permanent markers with a fine enough point to do that, and for another I’m terrible at drawing. The tape worked great and there was no smudging. This has been my first papercraft and was no easy task. It’s not perfect, but I’m very happy with it. Flaws only become apparent when looking at it very closely which, sadly, is probably what people will be doing. However, I’ve already made it very clear to my family that any negative review of it may well be met with several short, quick strikes to the jugular region with a humorously tiny hobby knife. There are a few places where the “glue this here” text is still slightly visible, and some guiding lines can be seen, but considering the microscopic size of the thing as a whole I’m quite proud of it. I’ll sleep now, but tomorrow I’ll borrow my mother’s digital camera and send some images– if your hall of fame will accept them.
I think once I get over the sheer frustration of this first project I’ll set about building your Cloud and Link statues.
Also, please make a Sora! I know it’s somewhere on your to-do list.
Of course the hall of fame will accept your pictures, I’m looking forward to seeing what you made of it! ;o)
The “Going Merry” did turn out quite small, much smaller than most people think; it’s a real challenge for a first papercraft so I’m very happy to hear you like it!
I wandered around wal-mart for half an hour and I couldn’t find any clear printing paper. There was tracing paper, but that’s only clear it it’s right up against the thing on the other side, and it wouldn’t fit in my printer anyway. There wasn’t any plastic paper either. Where can I find clear paper for the ropes part. I’ve tried several times, and that piece is just to detailed to cut out without leaving a lot of white space.
Yes, that’s why I chose this method instead of trying to cut all the ropes one by one, because that wouldn’t be strong enough I think.
Although I’m sure any shop can order some printable transparancies if you ask them to, they probably won’t want to order just one, so you would probably have to buy an entire pack, and they’re quite expensive…
Another person sent me a method of making the ropes out of actual ropes and hardening them by soaking them in glue (link) but if you are inexperienced with that it can be quite a hassle…
Another method of making the ropes that is quite easy, is to use non-printable transparancies. You can buy them, or use some from an old packaging material if you have some lying around.
Then you can take a permanent marker and trace the lines of the ropes onto the transparancy with the permanent marker, being careful not to smear the lines with your hand until it’s dry of course (some people put clear tape over the lines to prevent them from smearing if they’re not sure they used a real *permanent* marker… ;o)
Then you can cut the transparancy into shape and glue it to your boat! With the right glue, that shouldn’t be a problem, but if the transparancy is really smooth, maybe the glue won’t hold.
You could try roughing up the spots where you need to glue it with your knife a bit, or you could try using scotch tape again.
I hope this helps, good luck and have fun building!
my hull is to small for the base can you help me i print all the same size
If you printed it all the same size, the parts should fit; did other parts turn out too small as well?
The hull has many curves, and if you glue it a bit wrong, the fit with base can be off a little I guess. You should align the bottom of the hull (with the glueing tabs) with the edge of the base (you mean part 9 right?)
Is it only a couple of millimeters too small? Then you could try “stretching” the paper a bit to see if you can close the gap. Don’t pull too hard of course…! ;o)
If the gap really is too big, I would wait with glueing on part 9. Try glueing on part 10 (in the center of the hull) and parts 11-13 (at the back) to see if they fit: part 10 basically decides the length of the boat. Pre-shape/fold the deck (part 14) and see if it fits on top of part 10 and the hull (you don’t have to use glue just to check).
All these parts should fit of course, and if they do and part 9 is still too big, you can just trace the outline of the hull the size you made it onto the back of part 9 and cut that line, instead of the one I intended.
I hope you can get it to work, have fun building!
I love this papercraft but i was wundering why its painted?
The “Going Merry” was one of my first paper models, before the Pepakura era, when I made all my models by hand.
I kinda liked the hand drawn look of them, and I felt it would be a shame to “texture” it on the computer, so I did that by hand as well, using water colours. It was a big experiment for me to see what the “wood” would look like when printed, but I was very happy with the results, it was better than I expected!
So basically it looks painted, because it is painted. ;o)
does a sharp knife work better than scissors?
I prefer to use a knife because it allows me to be more precise. Scissors work too of course, but if you use big ones, it is hard to cut out small parts. And if you need to cut out a small hole inside a small part, a knife is just much easier.
For my “Going Merry”, I don’t recommend using scissors, because it has a lot of small parts. And even the King of Red Lions has some pretty small cuts in the head area…
A cheap craft’s knife would be a good investment if you want to build a papercraft model, imho! ;o)
thanks anyways i was working on the king of red lions and none of my pieces are the right size. please help.
Hm, I’m not exactly sure what you mean by that…
If you mean you are *building* it, you have to make sure that all the pages are printed at the same scale. But because King comes in PDF format, this should be done automatically by the program!
If you mean you are *copying* the parts to a different file to scale them bigger, you have to make sure that you copy the parts at the same scale, and that you paste them the same scale.
You will need to make more than one sheet, so if you scale them to 200% (for example) on one page, you will also need to scale them to 200% (the same scale) on the next page.
It is easiest if you make a blank sheet that is the size of your printable area, and then copy the parts to that same file again and again, and save it as a copy.
That way you can be sure the sheet is always the same size (instead of cutting out and scaling all the parts seperately; that way, one “page” will be bigger than the other, and the printer might automatically scale it “fit to page”, which will result in different print scales…).
i really like this papercraft but can you make it bigger because i use 80 gsm and the small ones are harder because i have no real crafting tools so please help out.
You don’t really need “special” tools for papercraft, just some glue, a sharp knife and a toothpick or something similar is really enough. Your fingers are the real tools. ;o)
You could take the templates for the “Going Merry” into an image editing program (like Photoshop if you have it or Gimp (which is free) or even good old MS Paint) and then you can scale up the parts as much as you like.
The only thing is, that some of the parts won’t fit onto one regular sized sheet anymore; but if you cut them off in the image editing software, you can put the two halves on seperate pages, and glue (or tape) them back together again after you’ve cut them out. That’s the best way I think unless you have access to a large format printer/plotter…
The “Going Merry” has a lot of small parts, so take your time and have fun, take a break if you’re becoming frustrated so you can continue later on when you feel like it again.