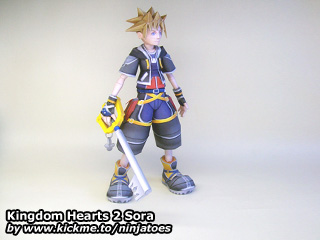
094004 Sora (May 31, 2010)
from: Kingdom Hearts 2 video game / size: ± 23 cm
Download:
parts (2,10 MB PDF file)
instructions (2,36 MB PDF file)
Pictures:
Google Photos

094004 Sora (May 31, 2010)
from: Kingdom Hearts 2 video game / size: ± 23 cm
Download:
parts (2,10 MB PDF file)
instructions (2,36 MB PDF file)
Pictures:
Google Photos

hello
Excuse me but I do not understand how in fact the piece 2 and 3
Building a papercraft model is all about giving the 2D parts you cut out the right 3D shape before glueing them together. Often, you can probably already imagine what the shape should be, and you can check with the step by step instructions if you thought right. ;o)
Parts 1 and 2 of Sora are parts of his leg, and should basically look like a couple of cylinders, and the “cylinder” of part 1 will have a bottom with a hole.
The first thing you should do after cutting out the parts is pre-shape them: curve the walls of what will be the cylinders, so it will be easier to glue them together (you can see what I mean by “pre-shaping” in this YouTube video I made: http://www.youtube.com/watch?v=8hCwL4HW12w and in Yamaha’s papercraft tutorial too under “Basic Instructions > Curving”: http://global.yamaha-motor.com/yamahastyle/entertainment/papercraft/howto/0002.html (Yamaha’s papercraft tutorial explains several other basic papercraft techniques as well! ;o)
Then it is simply a matter of applying some glue on the white glueing tabs, and glueing the two ends together of the paper strips to make the cylinders. In the case of part 1, do the same for what will be the bottom of the hole, and then fold the bottom piece up until you can glue the smaller glueing tabs to the bottom edge of what will be the “cylinder” if the leg.
To glue the separate parts 1 and 2 together, hold them together the way they are laid out on the template sheets, and on the two cylinders, there will be an “edge” where you glued the two ends of the cylinders together.
Lign up those two edges, apply some glue on the glueing tabs on part 1 and gently push it up into the bottom of part 2, until the glueing tabs are all inside the bottom of part 2 and the edges of the black colours meet.
It is very difficult to explain how to assemble papercraft parts in just words unfortunately, but I hope you can understand what I mean if you have the parts in front of you…!
Of course I can’t possible explain it for every part in this extensive way, but like I said, try to imagine in your head what every part should look like when it’s are assembled, and then fold and pre-shape the parts to make it look that way.
If you’re not sure, try it without glue first and check to see if the result looks like the pictures in the step-by-step instructions, then when you’re satisfied, apply some glue and glue the parts together.
For more basic tips and tricks, check the other parts of Yamaha’s excellent papercraft tutorial, and for the rest, take your time and have fun! And if you get frustrated because a certain part gives you a lot of trouble, leave it alone for a while and maybe try again later on with a clear mind after studying the instructions and trying different ways without glue first, sometimes that helps.
Good luck and have fun!
Hey!
I’m sorry if I’m posting on a “dead” article or if i’m asking too much, but I’m pretty new in papercrafting and i’m really interested in building this wonderful model…but, before, i’d like to know his height(just a personnal curiosity before building), cause I didn’t manage to find it out…As first sight, I would say about 20 cm, but I’m not sure at all ^^”
And then, is this model hard to build? I’ve seen your explanations and it looks “easy” thanks to the comprehensive step by step, but i’m not really confident in my skills since this will be my first “complex” craft. Would you recommend it to someone that have just done cubes characters, octopus and chickens crafts up to now, or does it requires some experience in such long works?
Thanks a lot :)
Although Sora is a bit more difficult than a Cubee of course, I think you can really build any paper model if you take your time. ;o)
If you feel you’re getting tired of a difficult part, you can simply put the parts in a safe place and leave the model alone for a while until you feel like trying again.
Your guess was pretty good: Sora is about 23 cm tall, including his “spiky” hair. ;o)
I think the most difficult parts are his hands and his hair (because all the “spikes” can be confusing if you try to make it all at once, so only make one part at a time and follow the steps one at a time. ;o)
Most parts don’t have to be folded, but curved/pre-shaped: that means rolling the paper until it holds it shape of a curve/cylinder. That will make building it much easier.
Here are two videos of what I mean by “pre-shaping”:
video 1 | video 2
And it’s also mentioned in this papercraft beginner tutorial from Yamaha: link
If you’re patient and take your time, I’m sure you can do it, have fun! ;o)
Oh, thanks a lot for the videos, smart method, I think i got it, just need the rod :-)
You convinced me, it’s printing :D
Happy holidays!
It doesn’t have to be a metal rod of course (for smaller parts I just use a toothpick, and for bigger parts I often use the back of my X-Acto knife) the technique is very simple and useful. ;o)
Like I said, take your time and have fun building!
Heyo!
Yeah, i’m posting it (very) in late but I wasn’t able to take pictures before today, and I thought it would be the least polite to show it to you after all the advices you gave me!
Hi again! Looks like it turned out great! Some parts are quite small and can be quite difficult, but you did a great job! ;o)
I need the PDO pls can you post that’s PDO pls
For the templates you can download here, I made several test builds and adjustments, and then I copy+pasted the fixed parts of all the different *.pdo files together in Photoshop; there simply isn’t a good *.pdo file with all the correct parts to build this Sora, sorry…!
You can print the parts from the PDF file, though (you need a PDF reader like Adobe Reader to open PDF files) and with the directions on the templates and the step-by-step instructions, I’m sure you’ll be able to build it!
The most important thing is to take your time, and make sure you fold and pre-shape all the parts properly according to the fold lines and the pictures you see in the instructions. Take it one part at a time, and examine the pictures in the instructions closely when you need to.
If you’re not sure about a certain part, try it without glue first to see if it goes together the way you thought. That way, if it doesn’t, you can always try a different way, and seeing the part assembled (even if it’s not the correct way) often helps to see the right way.
Good luck and have fun!
What program’s do you use, both for getting the data, and for modifying your 3d images? You can mail me, if you’re uncomfortable posting it. I want to make a group of some of the heartless from KH1 and KH2, but I can’t seam to find a good program for getting the 3d models so that I can modify them in 3ds max.
Any help would be appreciated.
I used a combination of yaz0r’s Kingdom Hearts model viewer and 3D Ripper DX to extract the original 3D models from the game. After that, I used Metasequoia to remodel simpler versions of them, because the Kingdom Hearts models have a lot of very small parts, but that step can be done in any 3D program you’re comfortable with. ;o)
hey ninjatoes what type of markers do you use for the edge coloring and if they are sold in the us where cani get them
For markers, I usually use Bruynzeel markers (Bruynzeel-Sakura company nowadays) but whether or not they’re availabe in the US, I don’t know I’m afraid…
But if you can’t find them, you can really use any kind and brand of marker you like of course!
For lighter colours though, I usually use pencils or crayons, because with markers, the paper “sucks” in the ink making the colours much darker than you expected…
wowoowowowowow!!!! it’s amazing finally u made it.thx.
OMG ninjatoes ur amazing i love ur crafts and ur just so awsome :P lol
Thanks, I’m glad you like it; have fun building!
hi
what kind of paper (i know thicker paper, but how much thicker? xD), glue and knife would u recommand to build the papercraft? (are scissors a good idea for cutting?)
I always use 200 gsm (grams per square meter) paper, which is about 2.5 times as thick as regular printer paper. Most people use 120-160 gsm paper.
Like most things, it’s really just a personal choice, I like to use “Tesa hobbylijm” (Tesa All-purpose glue) while others like to use white PVA glue.
And of course a sharp pair of scissors can cut through paper just as well as any sharp knife; I’m more comfortable using a knife, but after building a few paper models, but I bet you will get a pretty good idea of what works best for you soon enough! ;o)
Have fun building!
are you dutch? (hobbylijm sounds dutch to me ;) )
in ieder geval bedankt :D
en laat ons hopen dat het iets moois wordt ;)
cya
Yeah, I’m dutch. ;o)
Ik ben er zeker van dat het wel goed komt, have fun building! ;o)
this is the best papercraft ever
Thanks for the compliment haha, I’m glad you like it! ;o)