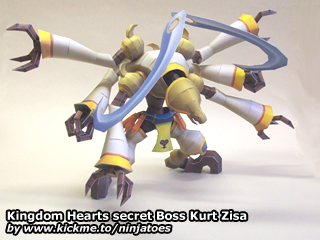
070001 Kurt Zisa (January 31, 2009)
from: Kingdom Hearts video game / size: ± 16 cm x 31 cm x 28 cm
Download:
parts (4,39 MB PDF file)
instructions (3,08 MB PDF file)
some extra help aligning Kurt Zisa’s legs: 1
Pictures:
Google Photos

070001 Kurt Zisa (January 31, 2009)
from: Kingdom Hearts video game / size: ± 16 cm x 31 cm x 28 cm
Download:
parts (4,39 MB PDF file)
instructions (3,08 MB PDF file)
some extra help aligning Kurt Zisa’s legs: 1
Pictures:
Google Photos

i love your siet. um can you make sonic the hedgehog papercrafts if you can i mean.
I would really like to make some papercraft Sonic models in the future, but because I have so many other ideas too, I can’t promise you when I’ll finally get around to it, sorry…
There’s a nice 3D diorama and Tornado plane here, and some simple models from Chao Laboratory here, but no Sonic, though…
There were two Sonic and Shadow models available through a print service in Japan some years back (link) but that service has been discontinued unfortunately…
But you can still find them online on lots of papercraft websites now, for example if you search for “Sonic+Shadow papercraft” on Google. ;o)
ho that’s ok i just wuddit too know. but that werd awesome um do like sonic and mario i like both. i love your paper craft’s aww ther awesome. well see ye!
make a sora, moogle, riku, kiari, king mickey, donald, and goofy papercraft
There are many more models from Kingdom Hearts that I’d like to paperfy, but of course since I can’t work on it 24/7, it will be some time until I get around to making all of them…! ;o)
if you can, can you please put a pdo file
No, sorry; there is no one Pepakura *.pdo file which has all the correct parts, only the *.pdf file has all the final, fixed parts, so you will have to do with the step by step instructions (and your own wits of course, which is far more important ;o)
Always pre-shape the parts before you try to glue them on, and if you’re not sure about a part, try to see if it fits without glue first, and if it doesn’t work the way you thought, have a look at the instructions and try folding/pre-shaping the part a different way.
I hope you can use these tips if you hit any problems, good luck and have fun building!
make a sora papercraft
I will, don’t worry. ;o)
can you include a pdo file with this and other papercrafts
No, sorry; after the unfolding and fixing and unfolding again, the only completely fixed version of the model’s parts is the PDF version.
If you’re having trouble figuring out how to assemble him, try pre-shaping the parts the way you think is right, but before actually glueing them on, try to see if they fit that way without using glue yet.
If it doesn’t, try a different way (the step by step instructions should give you a good indication of what the parts should look like: there’s only so many ways you can fold a certain part, so you’re bound to get it right sooner or later! ;o)
Good luck and have fun!
200 gsm is 110 pound paper
Only if you’re using index paper; the thing is, that there are too many variables to make a definitive conversion.
In the lbs system, the paper weight is not just determined by the size and weight of the paper, but also by what kind of paper you’re using: http://www.hagadoneprinting.com:8080/4daction/paperWeightConverter
what size and type of paper would you recommend?
Sizewise, I use ISO A4 paper (210mm x 297mm). But if you’re in the US, and all you can get is Letter sized paper, that will work too (the sheets and thus the parts) will just be printed at a slightly smaller scale to make them fit the paper. ;o)
By type of paper, I think you mean thickness/paper weight? I use 200 gsm (grams per square meter) paper, which is about 2.5 times as thick as regular paper. But you can really use any type you’d like, most people tell me they use 160 gsm (twice as thick as regular paper) and some just use regular paper.
I’m afraid I’m not sure what the lbs equivalent is for those paper weights, because conversion is a bit… troublesome… ;o) One day I might try to figure it out and I’ll let you guys know.
For now, you can look at the paper weight of your regular paper, multiply it by 2, and that would be a paper weight to try out, I think. ;o)
ohh my god that is outstanding “applause”
Thank you, have fun building should you try it. ;o)
too awesome :O
Haha, just awesome enough I’d say, I really like it. ;o)